OAuth for FileMaker Developers: How It Actually Works
As more APIs move toward modern security standards, OAuth 2.0 has become the default way to authorize access to services like Shopify, Google, QuickBooks, HubSpot, and many others.
FileMaker can call any HTTP API using Insert from URL, but OAuth adds concepts such as authorization codes, access tokens, refresh tokens, scopes, and redirects that are not obvious at first glance.
This guide is aimed at FileMaker developers who want to understand how OAuth actually works and how to implement it reliably inside a FileMaker solution.
Why OAuth Exists
Before OAuth, many integrations simply stored usernames and passwords and sent them with every request. This approach is insecure and inflexible, especially when multiple applications need access to the same account.
OAuth solves this by introducing:
- Tokens instead of passwords
- Fine-grained scopes (what the app is allowed to do)
- Limited lifetimes for access tokens
- Refresh flows so users do not have to log in constantly
In short, OAuth is about delegating access safely: your FileMaker app gets permission to act on a user’s behalf without ever seeing their password.
High-Level OAuth Flow for FileMaker
At a high level, the most common flow for FileMaker integrations is the OAuth 2.0 Authorization Code flow. In a FileMaker-friendly form, it looks like this:
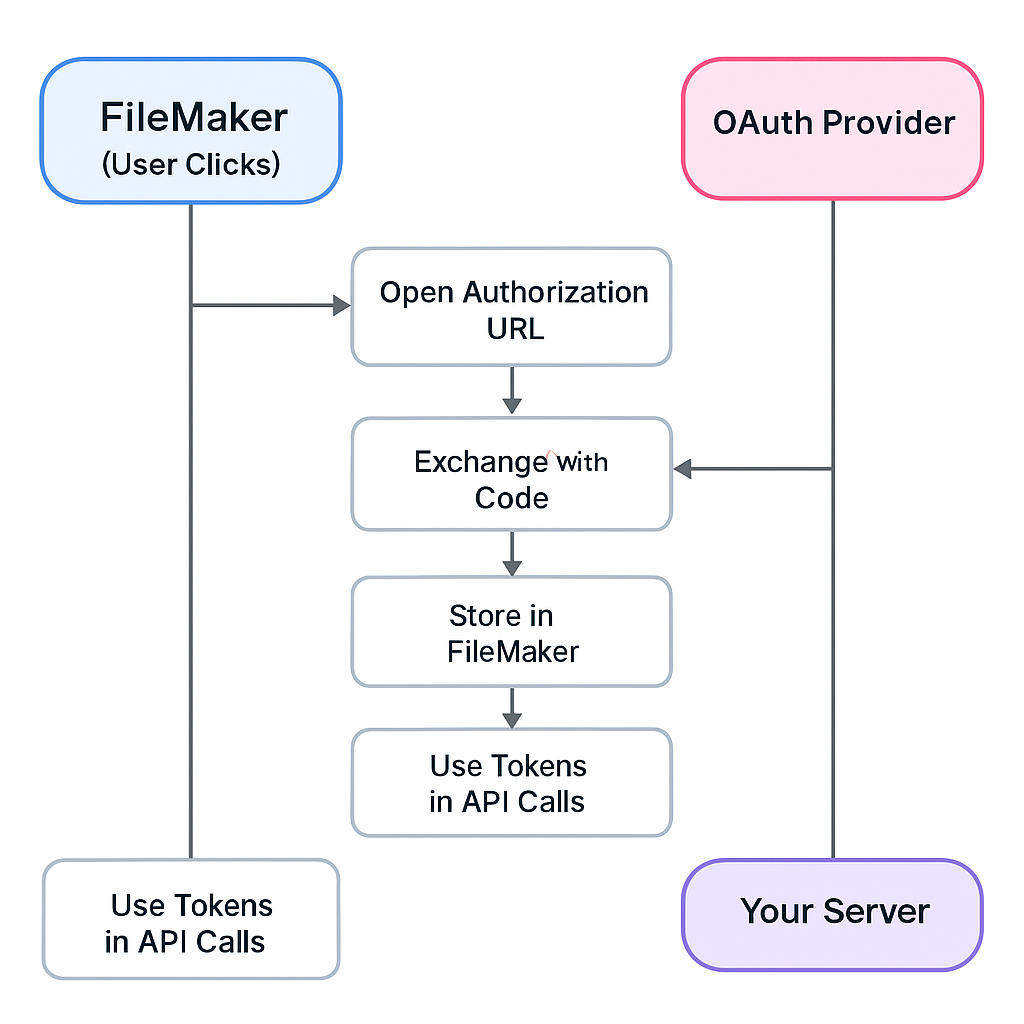
FileMaker does not typically receive the redirect directly. Instead, a small web endpoint that you control captures the authorization code, exchanges it for tokens, and passes those tokens into FileMaker.
Key OAuth Concepts for FileMaker Developers
Authorization Code
After the user signs in and approves access, the OAuth provider sends back a short-lived authorization code. This code is not used for API calls directly. It must be exchanged for tokens almost immediately.
Access Token
The access token is what your FileMaker scripts send with each API request:
Authorization: Bearer <access_token>Access tokens usually expire after minutes or hours. Your integration must be prepared to refresh them.
Refresh Token
The refresh token is a long-lived credential that allows you to obtain new access tokens without requiring the user to log in again. It must be stored securely and never hardcoded into scripts.
Scopes
Scopes define what your app is allowed to do. For example, an identity provider might offer scopes such as:
openidemailprofile
Your FileMaker integration only gets access to the areas defined by the scopes you request and the user approves.
Redirect URI
After a user signs in, the OAuth provider redirects the browser to a predefined redirect URI, such as:
https://yourapp.com/oauth/callback?code=XXXXX
That endpoint must be something under your control (for example, an Azure Function or a small .NET web API) that can capture the code, exchange it for tokens, and then pass those tokens into FileMaker via the Data API or another integration path.
Designing an OAuth Storage Model in FileMaker
A simple and effective pattern is to maintain an OAuthCredentials table:
Table: OAuthCredentials

Fields:
- Provider          (Text)       // e.g. 'exampleapi', 'google', 'quickbooks'
- AccessToken       (Text)
- RefreshToken      (Text)
- TokenExpiryTS     (Timestamp)  // When the access token expires
- Scope             (Text)
- CreatedAt         (Timestamp)
- UpdatedAt         (Timestamp)
- Active            (Number)     // 1 = current record for this provider
For single-tenant solutions, one active record per provider is often enough. For multi-tenant or multi-store scenarios, add fields such as TenantID or StoreDomain and store one record per tenant or store.
Step 1: Building the Authorization URL in FileMaker
The first step is to send the user to the OAuth provider’s authorization page. In FileMaker, you can construct the URL using a calculation like this:
Let ([
    clientId     = "your_client_id_here" ;
    redirectUri  = "https://yourapp.com/oauth/callback" ;
    scope        = "openid email profile" ;
    state        = Get ( UUID ) ;

    baseAuthUrl  = "https://accounts.example.com/oauth/authorize" ;

    queryString =
        "client_id=" & clientId &
        "&redirect_uri=" & Substitute ( redirectUri ; " " ; "%20" ) &
        "&response_type=code" &
        "&scope=" & Substitute ( scope ; " " ; "%20" ) &
        "&state=" & state
] ;

    baseAuthUrl & "?" & queryString
)
A script can then set a variable $authUrl to this calculation and use Open URL or a Web Viewer to display the OAuth login page to the user.
Step 2 & 3: Exchanging the Authorization Code for Tokens
Once your redirect endpoint receives the code, you need to exchange it for access and refresh tokens. This can be done server-side or inside FileMaker itself using Insert from URL.
The following script sketch shows how this might look inside FileMaker for a generic OAuth provider:
# Script: OAuth_ExchangeCodeForTokens

Set Variable [ $code ; Value: <authorization_code_from_callback> ]
Set Variable [ $clientId ; Value: "your_client_id_here" ]
Set Variable [ $clientSecret ; Value: "your_client_secret_here" ]
Set Variable [ $redirectUri ; Value: "https://yourapp.com/oauth/callback" ]

Set Variable [ $tokenUrl ; Value: "https://accounts.example.com/oauth/token" ]

Set Variable [ $jsonBody ;
    JSONSetElement ( "{}" ;
        [ "grant_type" ; "authorization_code" ; JSONString ] ;
        [ "code" ; $code ; JSONString ] ;
        [ "client_id" ; $clientId ; JSONString ] ;
        [ "client_secret" ; $clientSecret ; JSONString ] ;
        [ "redirect_uri" ; $redirectUri ; JSONString ]
    )
]

Set Variable [ $curl ;
    "-X POST" & " " &
    "--header " & Quote ( "Content-Type: application/json" ) & " " &
    "--data " & Quote ( $jsonBody )
]

Insert from URL
[ Select ; With dialog: Off ;
  Target: $response ;
  URL: $tokenUrl ;
  cURL options: $curl
]

# Parse JSON response
Set Variable [ $accessToken  ; Value: JSONGetElement ( $response ; "access_token" ) ]
Set Variable [ $refreshToken ; Value: JSONGetElement ( $response ; "refresh_token" ) ]
Set Variable [ $expiresIn    ; Value: JSONGetElement ( $response ; "expires_in" ) ]

# Compute expiry timestamp
Set Variable [ $expiryTS ; Value: Get ( CurrentTimestamp ) + $expiresIn ]

# Store into OAuthCredentials
Go to Layout [ “OAuthCredentials” (OAuthCredentials) ]
New Record/Request
Set Field [ OAuthCredentials::Provider      ; "exampleapi" ]
Set Field [ OAuthCredentials::AccessToken   ; $accessToken ]
Set Field [ OAuthCredentials::RefreshToken  ; $refreshToken ]
Set Field [ OAuthCredentials::TokenExpiryTS ; $expiryTS ]
Set Field [ OAuthCredentials::CreatedAt     ; Get ( CurrentTimestamp ) ]
Set Field [ OAuthCredentials::UpdatedAt     ; Get ( CurrentTimestamp ) ]
Set Field [ OAuthCredentials::Active        ; 1 ]
In a production solution, you would add checks for errors and handle cases where the provider does not return a refresh token.
Step 4 & 5: Refreshing Tokens When They Expire
Access tokens expire. Instead of failing API calls and forcing users to log in again, your scripts can automatically refresh the access token when needed using the stored refresh token.
The following script pattern looks up the active credentials for a provider and refreshes the token if it is close to expiry:
# Script: OAuth_RefreshTokenIfNeeded ( provider )

Set Variable [ $provider ; Get ( ScriptParameter ) ]

# Find active credentials for this provider
Go to Layout [ “OAuthCredentials” (OAuthCredentials) ]
Enter Find Mode [ Pause: Off ]
Set Field [ OAuthCredentials::Provider ; $provider ]
Set Field [ OAuthCredentials::Active   ; 1 ]
Perform Find

If [ Get ( FoundCount ) = 0 ]
    Exit Script [ TextResult: "No credentials for " & $provider ]
End If

Set Variable [ $accessToken   ; Value: OAuthCredentials::AccessToken ]
Set Variable [ $refreshToken  ; Value: OAuthCredentials::RefreshToken ]
Set Variable [ $expiryTS      ; Value: OAuthCredentials::TokenExpiryTS ]

If [ Get ( CurrentTimestamp ) < $expiryTS - 60 ]  // 60 seconds buffer
    Exit Script [ TextResult: $accessToken ]  // still valid
End If

# Token expired or near expiry – refresh

Set Variable [ $tokenUrl ; Value: "https://accounts.example.com/oauth/token" ]

Set Variable [ $jsonBody ;
    JSONSetElement ( "{}" ;
        [ "grant_type"    ; "refresh_token" ; JSONString ] ;
        [ "refresh_token" ; $refreshToken   ; JSONString ] ;
        [ "client_id"     ; "your_client_id_here" ; JSONString ] ;
        [ "client_secret" ; "your_client_secret_here" ; JSONString ]
    )
]

Set Variable [ $curl ;
    "-X POST" & " " &
    "--header " & Quote ( "Content-Type: application/json" ) & " " &
    "--data " & Quote ( $jsonBody )
]

Insert from URL
[ Select ; With dialog: Off ;
  Target: $response ;
  URL: $tokenUrl ;
  cURL options: $curl
]

Set Variable [ $newAccessToken ; Value: JSONGetElement ( $response ; "access_token" ) ]
Set Variable [ $newRefreshToken; Value: JSONGetElement ( $response ; "refresh_token" ) ]
Set Variable [ $expiresIn      ; Value: JSONGetElement ( $response ; "expires_in" ) ]

Set Variable [ $newExpiryTS ; Value: Get ( CurrentTimestamp ) + $expiresIn ]

# Update record
Set Field [ OAuthCredentials::AccessToken   ; $newAccessToken ]
Set Field [ OAuthCredentials::RefreshToken  ; Case ( $newRefreshToken ≠ "" ; $newRefreshToken ; OAuthCredentials::RefreshToken ) ]
Set Field [ OAuthCredentials::TokenExpiryTS ; $newExpiryTS ]
Set Field [ OAuthCredentials::UpdatedAt     ; Get ( CurrentTimestamp ) ]

Exit Script [ TextResult: $newAccessToken ]
Now any script that needs an access token can call OAuth_RefreshTokenIfNeeded and always receive a valid token (or an error message if credentials are missing).
Example: Using OAuth with a GraphQL API Call
To see how this fits together, consider a simple GraphQL API call that lists items. The script first ensures it has a valid access token, then calls the external GraphQL endpoint:
# Script: ExampleAPI_ListItems

# Ensure we have a valid token
Set Variable [ $accessToken ;
    Value: Perform Script [ “OAuth_RefreshTokenIfNeeded” ; Parameter: "exampleapi" ]
]

Set Variable [ $url ; Value: "https://api.example.com/graphql" ]

Set Variable [ $graphQLQuery ;
"
{
  items(first: 10) {
    edges {
      node {
        id
        name
      }
    }
  }
}
"
]

Set Variable [ $jsonBody ;
    JSONSetElement ( "{}" ;
        [ "query" ; $graphQLQuery ; JSONString ]
    )
]

Set Variable [ $curl ;
    "-X POST" & " " &
    "--header " & Quote ( "Content-Type: application/json" ) & " " &
    "--header " & Quote ( "Authorization: Bearer " & $accessToken ) & " " &
    "--data " & Quote ( $jsonBody )
]

Insert from URL
[ Select ; With dialog: Off ;
  Target: $response ;
  URL: $url ;
  cURL options: $curl
]

# Then: parse $response with JSONGetElement and your parsing routines
This pattern keeps OAuth concerns separate from your business logic while still giving your FileMaker scripts full access to modern APIs.
Common OAuth Pitfalls in FileMaker
- Trying to make FileMaker itself the redirect target instead of using a small web endpoint to capture the code.
- Storing tokens in global fields instead of in a dedicated table with proper structure.
- Not handling expiration, which leads to intermittent failures that are hard to debug.
- Using the wrong OAuth flow for the provider (for example, a device code flow where a server-side flow is expected).
Designing a clean pattern upfront avoids many of these problems and makes future integrations easier to implement.
Putting It All Together
A typical FileMaker solution that uses OAuth will include:
- An OAuthCredentials table to store provider, tokens, scopes, and expiry timestamps.
- A script to build and open the authorization URL.
- A small web endpoint to receive the authorization code and exchange it for tokens.
- A script like
OAuth_ExchangeCodeForTokensto store tokens in FileMaker. - A helper script like
OAuth_RefreshTokenIfNeededthat other scripts call to obtain a valid access token. - API scripts that focus on business logic and rely on the helper to supply a token.
Once this pattern is in place, adding new OAuth-based providers becomes much easier: you reuse the same model and change only the provider-specific endpoints and scopes.
Need Help Implementing OAuth in FileMaker?
OAuth can feel intimidating at first, but with the right structure it becomes another reliable part of your integration toolkit. If your team is working with SaaS APIs or needs help designing a solid OAuth pattern for FileMaker, expert guidance can save a lot of time and production risk.
If you’d like help planning or implementing OAuth-based integrations in FileMaker, you can reach out directly through the contact page.
Contact Wavebreak Development